When it comes to Anime Last Stand, raw damage isn’t everything — true mastery lies in creating a team synergy that makes your units stronger together. This guide dives deep into the Top 5 most powerful unit combinations, hidden synergy effects, and support unit strategies that can help you push further in Infinite Mode, defeat Raid Bosses faster, and farm resources efficiently.
4.1 Core Synergy Combos — Top 5 Meta Pairings
A strong lineup isn’t about stacking high DPS units — it’s about combining them so their strengths multiply. Here are the top 5 synergy archetypes dominating the current meta:
1. Armor Break Combo (Defense Shred + Physical DPS)
- Example Pairing: Erwin (Attack Boost) + Levi (High Physical Damage)
- Why It Works: Erwin’s leadership buff amplifies Levi’s single-target slashes, especially when facing high-defense enemies. Combined, they melt even tanky bosses in seconds.
- Pro Tip: Pair with a slowing unit like Rukia to keep enemies within Levi’s range longer.
2. Elemental Amplifier Combo (Status Application + Bonus Damage)
- Example Pairing: Ace (Burn Damage) + Aokiji (Freeze Bonus Damage)
- Why It Works: Ace inflicts consistent Burn, while Aokiji’s attacks deal increased damage to enemies under elemental effects.
- Hidden Trick: Elemental effects stack between allies — layering Burn + Freeze can deal double DoT (Damage over Time) if timed correctly.
3. Speed Surge Combo (Attack Speed Buff + Burst DPS)
- Example Pairing: Yoruichi (Speed Aura) + Gojo (Slow Cooldown but Massive Burst)
- Why It Works: Gojo’s cooldowns are long, but Yoruichi’s passive drastically reduces attack intervals. This combo turns Gojo into a near-continuous damage machine.
- Optimization Tip: Keep Gojo in Yoruichi’s range; her aura does not affect global units.
4. Crowd Control Lockdown Combo (Stun/Freeze Chain)
- Example Pairing: Todoroki (Freeze Field) + Killua (Electric Stun)
- Why It Works: Alternating Freeze and Stun ensures enemies barely move. Perfect for Infinite Mode wave 40+.
- Hidden Bonus: Each CC (crowd control) resets some enemy abilities — crucial when facing self-healing or shielded bosses.
5. Ultimate Buff Chain (Full-Team Buff Stack)
- Example Pairing: Bulma (Economy) + Erwin (Damage Buff) + Yoruichi (Attack Speed Buff)
- Why It Works: Bulma ensures fast economic growth, Erwin boosts total attack, and Yoruichi speeds up damage output. The trio forms the foundation of nearly every meta setup.
- Pro Tip: Keep these units centralized for maximum buff coverage.
4.2 Hidden Mechanics and Exploit-Level Tricks
Even veteran players miss some of the game’s hidden mechanics. Here are the secrets that separate elite players from casual grinders:
Evolution Path Efficiency
Not every final form is better — some mid-evolution units have shorter cooldowns or better AoE spread.
- Example: Rengoku (Stage 2) has higher damage uptime per cost than his final evolution in early Infinite waves.
- Recommendation: Stop evolving temporarily if the cost outweighs the marginal stat boost.
Damage Type Conversion
Some skills convert physical → elemental damage, allowing double scaling when paired with certain buffs.
- Example: Zoro’s special slash becomes Fire-type when affected by an elemental enhancer — it then benefits from Burn modifiers.
Range-Based Damage Falloff
Area skills like Madara’s Firestorm deal less damage at the edge of the AoE. Keep enemies close to the center by using slows or knockbacks to maximize impact.
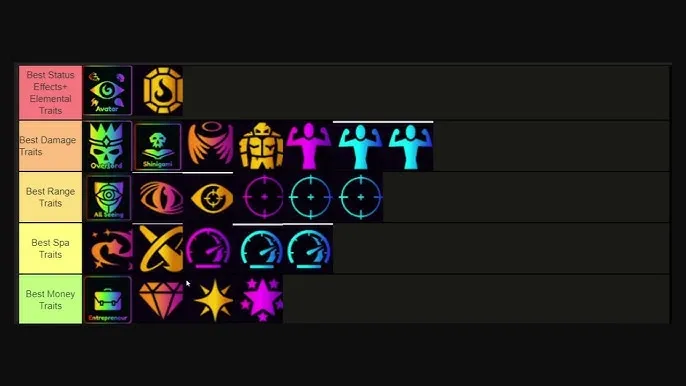
4.3 The Hidden Value of Support Units
Support units often go overlooked — but a great team relies on buffs as much as damage.
Support Tier List (2025 Meta)
| Tier | Unit | Role | Reason |
|---|---|---|---|
| S | Erwin | Global Damage Buff | Essential for Infinite & Raid modes |
| S | Bulma | Economy | Accelerates early-game scaling |
| A | Yoruichi | Attack Speed Buff | Boosts DPS for slow units |
| A | Rukia | AoE Freeze | Combines utility and control |
| B | Brook | Healing/Shield | Situational but lifesaving in long runs |
Buff Placement Techniques
- Overlap Zones: Buff auras stack if units stand at the edge of two overlapping fields — allowing double-boosted DPS.
- Center Line Rule: For maps with curved paths, position buffers at intersections to cover multiple firing angles.
- Timing Trick: Activate temporary buffs (like Erwin’s rally) right before boss invulnerability phases end to ensure full effect duration.
Final Thoughts
Mastering synergy is about understanding interaction, not just stats. The best Anime Last Stand teams build around combos that enhance each other — turning simple DPS numbers into overwhelming battlefield control.
Experiment with pairings, learn timing windows, and don’t underestimate mid-evolution units. With the right setup, your team can dominate both Infinite Mode and the most brutal endgame bosses.